While browsing on Facebook marketplace, someone posted a services where she can assist you to set an online appointment schedule in DFA for 300-500 pesos, I was surprised because setting up an online appointment is easy. This is the reason why we write this tutorial, we can help those people who need assistance for FREE and we can stop these fixers.
Screenshot of each steps are uploaded to ensure you follow the right method and easier to understand.
A valid and working email address. Your reference number and appointment details will be sent to your email. Createan email first if you don't have.
1. Go to (www.passport.gov.ph/appointment) and check the box of the term and conditions. Select the Individual Appointment or Group Appointment if you are with family or friends.

2. Select the nearest DFA Consular Office where you wish to set an appointment schedule to get or renew a passport.

3. Choose the available date and time. Red shaded date are already full schedule while greens are open.
Mark the check boxes after you select the date that suits your availability schedule. And hit the NEXT button.

4. Fill out all the required fields including your phone number, valid email address, name and birth details.

5. Input your Family information including Father's name and Mother's maiden name.

6. Choose your application type (New or Renewal of passport), basis of your citizenship. Fill in your emergency contact person and phone numbers.

7. In the next page enter your complete address and occupation.

8. Carefully review all the details of your application, any incorrect information that is inputted in the application form may result in delay in your application.
Mark the check box and hit the confirm button.

9. You can now select the processing type,
")
Reminder:
11. The page will then redirect to DFA ePayment Portal. You can see the list of Payment partners and guidelines. A 50 pesos convenience fee will be added with your processing fee.

14. Pay the appointment fee in authorized partners immediately, don't forget to present your reference number at the Payment Center upon payment of the passport processing fee. Keep the receipt that will be issued to you.

15. A confirmed appointment packet will be sent to your email once the payment has been successfully processed. Click the link to your passport appointment packet and PRINT OUT the following contents that you need to bring with you during your scheduled appointment:
Screenshot of each steps are uploaded to ensure you follow the right method and easier to understand.
Requirements:
Computer or Laptop with internet accessA valid and working email address. Your reference number and appointment details will be sent to your email. Createan email first if you don't have.
How to Set a DFA Online Appoinment Schedule?
1. Go to (www.passport.gov.ph/appointment) and check the box of the term and conditions. Select the Individual Appointment or Group Appointment if you are with family or friends.
2. Select the nearest DFA Consular Office where you wish to set an appointment schedule to get or renew a passport.
3. Choose the available date and time. Red shaded date are already full schedule while greens are open.
Mark the check boxes after you select the date that suits your availability schedule. And hit the NEXT button.
4. Fill out all the required fields including your phone number, valid email address, name and birth details.
5. Input your Family information including Father's name and Mother's maiden name.
6. Choose your application type (New or Renewal of passport), basis of your citizenship. Fill in your emergency contact person and phone numbers.
7. In the next page enter your complete address and occupation.
8. Carefully review all the details of your application, any incorrect information that is inputted in the application form may result in delay in your application.
Mark the check box and hit the confirm button.
9. You can now select the processing type,
- Regular Processing: Php 950.00 (10-15 working days)
- Rush Processing: Php 1,200.00 (5-7 working days)
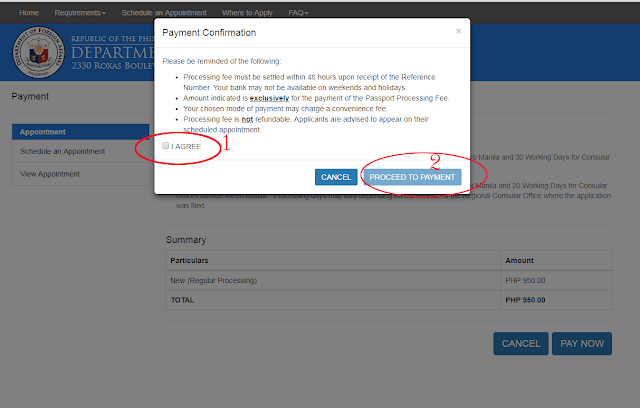
10. Read the reminder carefully. Agree in payment confirmation page and click the "PROCEED TO PAYMENT" button.
- You must settled your payment within 48 hours, failure to pay within the said time will cancel the appointment schedule.
- The Processing fee is not refundable. You must appear on the scheduled appointment.
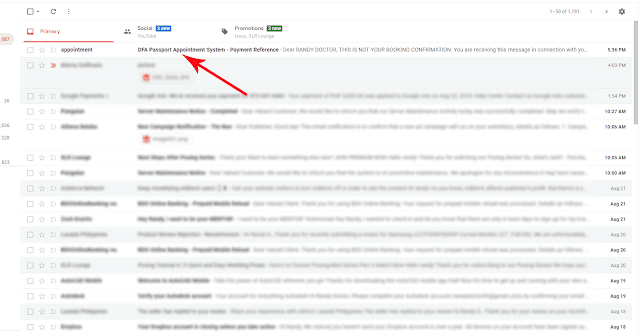
12. Check your email for any messages and click it to view your DFA Passport Appointment -Payment Refference number.
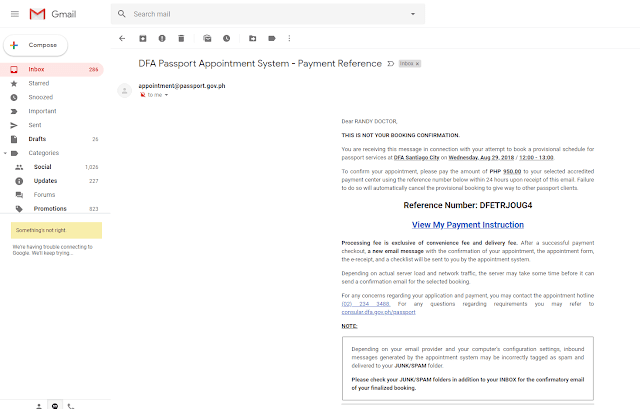
13. Open the email, you can now see your reference number. Click the "View My Payment Instruction" for payment guidelines.
14. Pay the appointment fee in authorized partners immediately, don't forget to present your reference number at the Payment Center upon payment of the passport processing fee. Keep the receipt that will be issued to you.
15. A confirmed appointment packet will be sent to your email once the payment has been successfully processed. Click the link to your passport appointment packet and PRINT OUT the following contents that you need to bring with you during your scheduled appointment:
- Checklist with your indicated schedule
- Confirmed Application Form with the bar code, appointment reference number (ARN), and eReceipt number
- Two (2) copies of the eRECEIPT
16. Your DFA online appointment schedule is done!
.jpg "How to Enroll at 2018 TESDA Free Online Course Program")

")


")


